Thursday, April 26, 2012

Studio Renovations - Custom Wood Flat File, part 2

Well, last entry saw my flat file looking pretty good, but not complete.

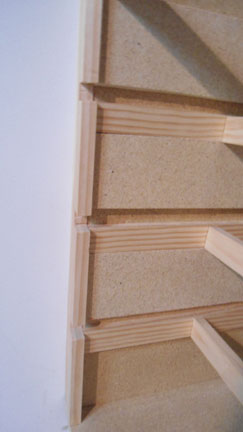
Here is what it looked like.  One thing I did not talk about last entry was the vertical boards I added to the front on the sides.  These two boards do three things.  First, they hide the ends of the flat files' sides.  Second, they are notched and guide the drawers through to the glides.  Third, they were cut to butt up against the walls and cover the gaps between the sides of the flat file and the walls surrounding it.  Here is another image of one of these boards where you can see the notches:

I had to cut the notches with a scroll saw, which is what I used for all the cutting.  I often clamped a four foot level to the particleboard and plywood as a guide to to keep my cuts straight.  The notches here were done by hand and end up being a little rough looking, although they look fine here.

Next, I put fronts on the drawers that will act as drawer pulls and will also keep items from slipping out of the drawers.  Here is an image of two drawers leaning against a wall with the fronts on them.

The fronts are made of 3/8" x 2" smooth slats. I sanded the front edges to a gentle rounding.  I glued these fronts on and then nailed them, making sure they were centered on the drawer.  The fronts also extend beyond the sides of the drawers a little bit.  This will end up covering my rough notches I mentioned earlier.

Here is an image of the flat file with the drawers installed.


Next, I had to create the top.  For this I used some sanded plywood.  But the walls surrounding the flat file are not square.  I wish I was a better carpenter, but there you go.  So how was I going to cut a top that would fit snug without big gaps between the top and the walls around it? To do this, I used drywall.  Or at least, I used a piece of drywall with two original edges that still had the 90 degree corner.  I laid one straight edge against the back wall and could then see, and measure, any gaps.

Here you can see that I have a 3/4" gap to account for.  The other side actually lined up pretty well, but there was a little bow to the wall.  Once I carefully measured these gaps and bows, I marked the plywood top and cut it.  The first fit was pretty good.  I had to trim a little off of the side with the bow, but it was easy and I was very happy with the fit.  I nailed the top to the frame and screwed the middle of the top to the uppermost supports underneath.  I finished by putting a piece of trim along the front of the top to hide the edge of the plywood and to have a rounded edge.  And here is what it looks like.


I ended up putting one more slat across the bottom shelf to hide the edge of the particle board and to make it match the fronts of the drawers.  The top of the flat file extends forward from the drawers about 5" so that I can sit on a stool and draw on the top.  It is quite comfortable.  The only additional thing I might do is wax the glides.  The drawers pull out fine, but they are heavy and a little wax would help keep them gliding smoothly for years to come.  Here is a picture with one of the drawers open.


And here is my helper:  Delilah was in my studio with me most of the time while I was making this flat file.  Every time I would cut a piece of wood, she would come over and pick up the scrap, go to a carpeted part of the studio, lay down and chew it to splinters.  My floor was covered with wood shavings - from her.


I hope you enjoyed this little how-to on making a flat file.  If you have any questions, feel free to ask.

Monday, April 23, 2012

Studio Renovations - Custom Wood Flat File, part 1

I have been doing some more renovations in my studio.  I have been building a custom flat file that will fill an area at one end of my studio and also serve as a drawing table.  I began with measuring the space so I could sketch a flat file plan big enough to hold pieces of paper 30" x 40".
Here is my sketch for figuring out how much lumber I was going to have to buy.  I based my design on a custom flat file I saw at Wet Paint art store.  My flat file is going to be 32.75" x 45" x 27".  I already have a base built on the floor so the total height of the finished flat file will be at 32".

I first cut the sides and back to fit on the base I had built previously.  They are made of particle board and I sealed them with some polyurethane so they will not absorb moisture and warp.  I next built runners, or drawer glides, that would be screwed to the sides.  I turned the sides over and clamped and screwed the drawer glides in from behind so screws wouldn't show.


  There are three drawer glides on each side and they had to line up with each other so when the drawers are installed they will not be out of alignment or crooked.  When completed, there will be three drawers I can pull out to access the paper and a fourth area at the bottom that will act like a shelf/storage area.  Once the drawer glides were attached, I assembled the sides and back panels.


I assembled most of the flat file outside of its final position so that I could screw through the side walls into the glides and supports.  Here are three of the six supports that will keep the sides and back in alignment and also support some of the weight of the drawers.  I placed the first set of supports 8" from the front and the second 8" from the back.  Here's what this stage looks like completed and moved into place. 


Below is a view of the glides.  I needed to add some wood to the sides in order to have a smaller area for the drawer to glide in.  As is, the drawers could easily angle up once they are pulled out more than halfway.   So I added the wood on the sides.


Next I cut the drawers to size, 32.75" x 44.75".  I slipped the drawers into place to help me "square" the flat file.  The flat file was sitting unattached on the base, but once I squared it with the drawers, I secured it with screws through the painting storage area to the left and also into the base.  Here is what it looks like with the unfinished drawers in place.


I will show you how I finished the flat file in my next entry, where I make pulls on the drawers, create a filler board to hide the gap between the file and the walls and put on a top.

Sunday, April 15, 2012

Illustration: Gerald's Grandpa

I have been spending a lot of time lately finishing up some secondary illustrations for The Book of Bartholomew.  These illustrations will be available throughout the stories of The Book of Bartholomew by clicking on words or areas of the stories.  One of the one's I completed this weekend was of Gerald's grandfather.  His grandfather does not have a name and is mentioned in the 2nd story, Gerald Teaches A Life Lesson

What did I want grandpa to look like?  I didn't know.  I wanted him to be bald and have glasses.  Other than that, I just started sketching.  Once I completed the pencil sketch, I inked it in.  Here is the completed inked drawing:

My thoughts were to create someone who was looking older.  Unfortunately, in the story, grandpa is already dead.  Characteristics of an older person, as represented in this drawing, include:
- large nose (I thought of Karl Maulden when I drew this - who is Karl Maulden, you ask.  Oh grow up, will you!)
- wrinkled lips
- jowls
- large ears
- bags under the eyes
- sunken cheeks
- bald (not necessarily old, babies are bald)
- glasses (younger people have had lasik)

Using a transfer of the image, I painted the coloring on watercolor paper.  Here is the painting that goes under the drawing:

What did I do here to emphasize the elderly gentleman?
- deep shadows under the nose and glasses
- redder color around the eye rims and nose bridge (nose bone is close to the skin here, causing reddish coloring)

I then put them both together and this is what I ended up with for Gerald's grandpa:

 In the final, I toned down the black of the lines so the overall image would be softer.  I like the image because there is a softness to him.  How could Gerald's grandfather look like such a nice old man when Gerald is such a jackass?  That's part of Bartholomew's world, people have a lot of stuff inside them. Even the bad people have a little good in them, and the good people have a little bad in them.  I happen to think that Gerald's grandfather was nice to people around him but somewhat cruel to his family.  Gerald got the short end of the stick and has been bitter ever since.

Saturday, April 14, 2012

Illustration: Toxic Puffs Cereal

One of the fun things about the project The Book of Bartholomew is that I get to create some funny stuff.  In one of the stories, Ned is eating Toxic-Puffs cereal.  So I got to create this illustration of a box of Toxic-Puffs cereal.  I was quite happy when it was completed, so I am sharing it with you here.  Enjoy!