Wednesday, January 25, 2012

Retouching Paintings

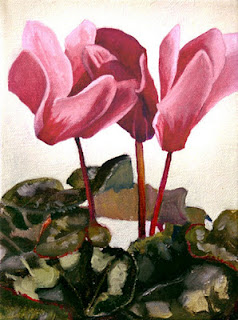
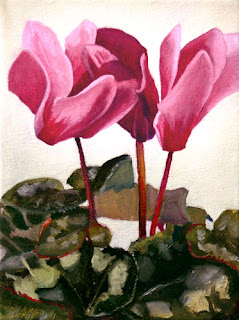
Part of renovating my studio has been going through old paintings and deciding what to keep and what to paint over.  It is interesting going back to old paintings after not seeing them for awhile.  Some, obviously should be painted over.  Others, because of my overly critical eye when I paint, look better than I remember them.  There was a series of small canvases I created last year where I timed myself.  When I reached my time limit I stopped, no matter what.  Some of these small paintings ended up looking great.  Others needed a little more time to look better.  Here are two examples.


The first version of this cyclamen painting was a bit flat in the flowers and, although not as obvious here, was a bit more orangey than fuscia pink.  I painted over the flowers in the first version of the painting with a bright pink glaze.  In the shadowy dark areas I mixed in a little permanent blue to the bright pink glaze.  By glazing, I didn't have to re-draw any lines or shapes.  I simply changed the color.  I was happy with the leaves and left those alone.


In this landscape of two islands up north, well, the first version is so bad I even misnamed it. I called it Hawk Island, when in fact it is Crow Island.  The painting felt clunky and needed just a little more time to refine, especially the water.  So, I went over the entire painting with glazes and some thicker paint here or there.  The two biggest changes were to create more contrast in the trees and less contrast in the water. I repainted almost all of the trees and the hillside behind with lighter and darker tones than were there.  I also punched up the highlights on the rocks.  The end result being that you now see through the tree trunks on the closest island to the furthest island.  I also made the leaves on the closer trees more autumnal in order to create even more contrast between them and the island behind.

Then I attacked the water with a scumble of very light blue-grey over the existing wave patterns.  This creates more of a surface on the water instead of a pattern.  This also creates more distance - as it makes the surface of the water lay down and feel more horizontal.

I never used to go back into paintings once they are completed.  But I find it fun when I know that just a few more minutes of tweaking will make a great improvement.

Wednesday, January 11, 2012

Oil Painting: Stir Fry Painting

Stir Fry
Media: Oil Paint on Canvas
Size: 18" x 24" x 1.5"

This is the completed oil painting from two posts ago.  Amy Sippl cooked the meal and I made a painting of it as an illustration for The Book of Bartholomew.  To see an early stage of this painting check out my previous post here on The Artist's Brain blog. This was a fun painting to create - a lot of small detail which was challenging, yet at the same time, it didn't take long to paint any one thing.  I think the hardest part were the handles, they project out from the wok on metal rods at odd angles.  At first the handles looked curved and striped instead of like smooth wood.

Saturday, January 7, 2012

Painting Finishes - Cold Wax

I have been busy lately renovating my studio and touching up old oil paintings. I have been putting final finishes on some of them. In the past, I have tried different kinds of varnishes but have never been happy with the final surface of my canvases. I paint with layers, allowing the colors underneath to show through here and there on the final layer of paint. In places where I use more oil, in order to thin the paint to glaze over another color, the surface ends up being more shiny than the surface around it. Other times I like to create a dry scumble of a lighter color over a darker color. Sometimes this ends up being a very flat or dry looking surface.

Creating a final surface with brush-on varnish would sometimes take a VERY long time to dry and would be too glossy. Spray varnishes, now maybe this is just me, but they make the surface look mechanical - too consistent - non-human. Varnish, in general seems to sit on the canvas, not act as part of the surface.

Non-human? Oh, he's off his rocker.

I recently have come across, thanks to recommendations from the staff at Wet Paint, cold wax medium.

This is a medium you rub onto the finished painting with a lint-free cloth. It doesn't need to be a tie-dye t-shirt like I am using here, but t-shirts work well for this.

You can see on this next painting the wax that I have  rubbed on.  It is a bit thick here.  It should be rubbed on thin without any ridges showing.  Rubbing in circles works best.  Let it sit for one day.  The next day, rub it again with a lint-free clothe to buff the wax.  It is just like waxing your car.  When you are buffing the wax, the microscopic platelets of wax are being flattened to overlap each other forming a protective skin.  If you don't buff, the painting still has some protection, but not as good as when the overlapping platelets form a skin. 

Overall, the wax creates a consistent satin surface to the painting that "feels" more a part of the painting than a varnish.  It smooths out inconsistencies in the shininess of the painting surface.  In this picture, on the left hand side of the image, you can see the shininess of a spray-on varnish.  On the far right of the painting, I have rubbed on some cold wax medium.  You can see the difference in shininess.

Also, wax can be applied to the surface of an oil painting as soon as the paint has dried to the touch.  Varnish should not be added to an oil painting until the paint has completely cured months later.  Wax still breathes and allows the paint to cure.  I am very happy with the wax and will continue to use it.